Installation
Installing Satchel is easy and painless. Satchel is a drag-and-drop module that works out of the box and with no configuration needed.
Satchel is available on the Creator Store, Wally, and GitHub Releases.
Creator Store GitHub Releases Wally
Satchel uses RunContext to run anywhere, so you do not need to move it from Workspace, though it is recommeneded to parent to ReplicatedStorage for best practices and organizational reasons.
Danger
Do not parent the Satchel to any starter containers or it will run multiple times. Older versions of Satchel required you to do this but it is no longer needed in versions v1.4.0 and newer.
Creator Store
The Creator Store is the easiest way to install Satchel. It is a one-click installation and requires no downloads.
Example
Below is a video on how to install Satchel from the Creator Store.
-
Get the Satchel model from the Creator Store.
-
Open Roblox Studio and create a new place or open an existing place.
-
From Studio's Window menu or Home tab toolbar, open the Toolbox and select the Inventory tab.

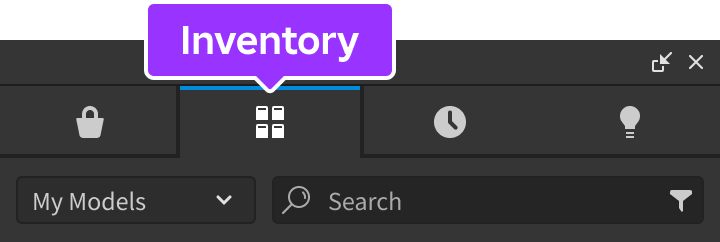
-
Locate the Satchel model and click it, or drag-and-drop it into the 3D view.
-
In the Explorer window, move the Satchel model into
ReplicatedStorage.
GitHub Releases
-
Download the
Satchel.rbxmorSatchel.rbxmxmodel file from GitHub Releases.Info
Binary (
.rbxm) and XML (.rbxmx) model files contain the exact same model..rbxmis a smaller file size to download. -
Open Roblox Studio and create a new place or open an existing place.
-
In the Explorer window, insert Satchel into
ReplicatedStorage. -
Select the Satchel model file you downloaded from GitHub.
Wally
You are expected to already have Wally setup in your Rojo project and basic knowledge on how to use Wally packages.
Warning
Wally does not include the loader script so you need to require() Satchel to run:
| Satchel Loader | |
|---|---|
1 | |
-
Open your Rojo project in the code editor of your choice.
-
In the
wally.tomlfile, add the latest Wally version for Satchel. Your dependencies should look similar to this:wally.toml[dependencies] satchel = "ryanlua/[email protected]" -
Install Satchel from Wally by running
wally install.